

How To Install Packages In R Shiny App On Shiny Server
An open-source solution to deploy enterprise-level R Shiny applications
Use docker + ShinyProxy to deliver your R data visualization products
![]()

For many R users, R Shiny has become a popular platform to build interactive web applications for data science. It allows people to easily visualize data analysis from R without messing with many lines of code. You can explore some powerful and visually attractive apps in R Shiny Gallery.
As a bioinformatics scientist, I provide biologists with state-of-the-art data analysis and visualization solutions of high-throughput experimental data. With the number of collaborators growing, I need to build a host of R Shiny apps to ensure a modularized, standardized, and reproducible workflow. However, if I want to scale up my project and put the system to wider use, I have to face several questions:
- How to run R Shiny apps on remote computer or cloud smoothly?
- How to deploy and manage multiple R Shiny apps from a single portal?
- How can R Shiny apps dynamically read and write files in the host system?
- Within R Shiny apps, can different users access different datasets?
These can certainly be achieved by Shiny Server Pro provided by RStudio. Nevertheless, I searched online resources, went through trials and errors, and found docker + ShinyProxy as a nice open-source solution, which enabled me to successfully deploy a fleet of R Shiny apps with the desired functionalities.
While the whole process is not technically demanding, I haven't seen a step-by-step tutorial on how to build these from scratch. Here, I aim to show you the journey of deploying two example R Shiny apps with user-specific data access, and hopefully, it would inspire your projects.
📝 Note: This tutorial describes how to deploy the multi-app system on a local computer. But the steps can be generally applied to the deployment on a remote computer or the cloud. I will include special notes when cautions are needed for the remote deployment.
ℹ️ All the files needed in this tutorial are hosted on my GitHub repository . There are five numbered subdirectories in the repo, corresponding to the five steps (Section 02–06) in this tutorial of building the final system. As we go through the tutorial, I'll also show you the links to the specific folders or files.
01. Software Requirments
We should have already installed R and RStudio. To build our example R Shiny apps, we also need to install shiny and tidyverseby calling install.packages().
Next, we will install docker. Since I am using macOS, I used this link to install Docker Desktop. To install it on other operating systems, you can find information here.
Why do we use docker?
The philosophy of docker is to encapsulate software code and all its dependencies so that it can run uniformly and consistently on any infrastructure, namely, the containerization strategy. R Shiny apps usually have many package dependencies. We'll first test its running on a local computer and then make them work remotely. Without containerization by docker, we'll have to make sure all the computers that run the apps have the same running environment. That means we'll spend much effort installing and configuring numerous software and packages. And when a package gets updated on the test computer, it has to be updated in all the other ones. We can see it will easily become painful to manage multiple R shiny apps in this way. With docker, we can pack the apps, their dependencies, and the running environment as a whole image. The image can be copied to other computers and we can just start running the apps (as long as that computer has docker installed). Without being disrupted by tedious installations and configurations, this type of practice greatly speeds up the workflow of software development and deployment.
02. Build R Shiny apps
Since this is just a proof-of-concept tutorial, we'll build two simple R Shiny apps. They can be easily scaled up for your larger projects since the general structure and filesystems are the same.
The first app "Hist_App" reads a numeric vector stored in a file and plots its distribution. As shown in Figure 1, we can choose one of the four datasets and adjust the number of bins. ( 💻 Source files)

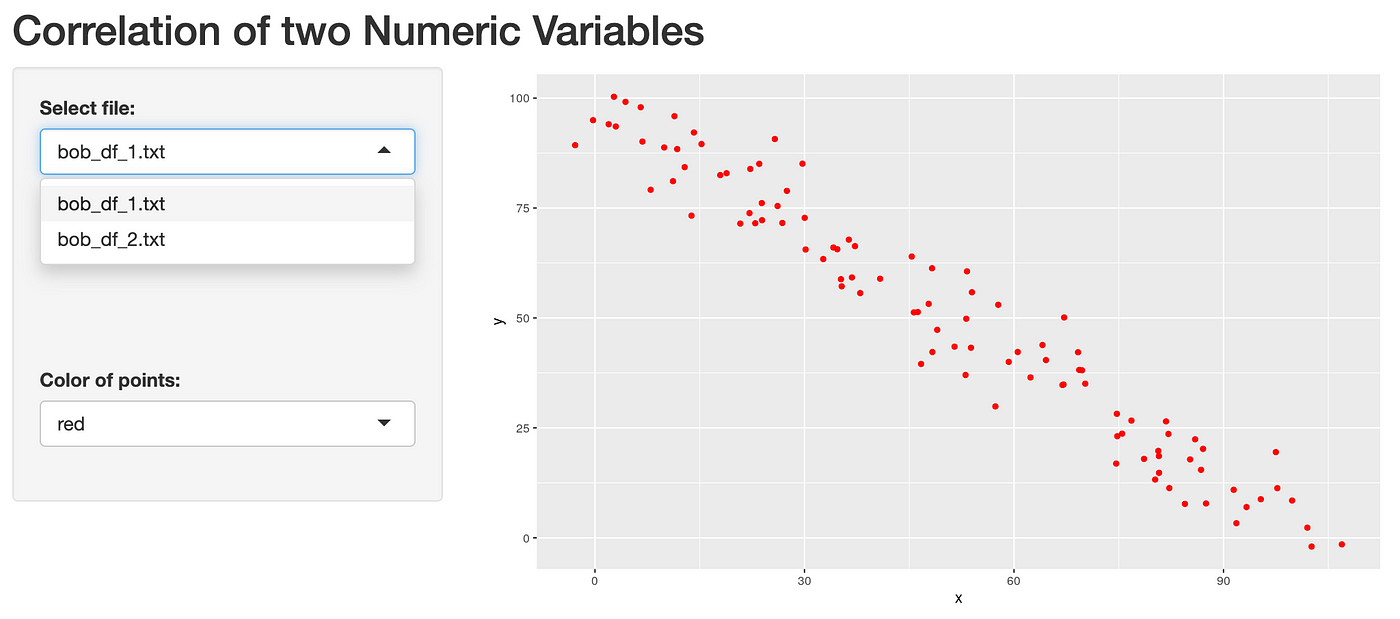
The second app "Scatter_App" reads a two-column dataframe stored in a file and draws the scatter plot of the two variables. Similarly, we can choose one of the four datasets and change the color of the points. ( 💻 Source files). In both apps, the data files are located in the./data/ folder.
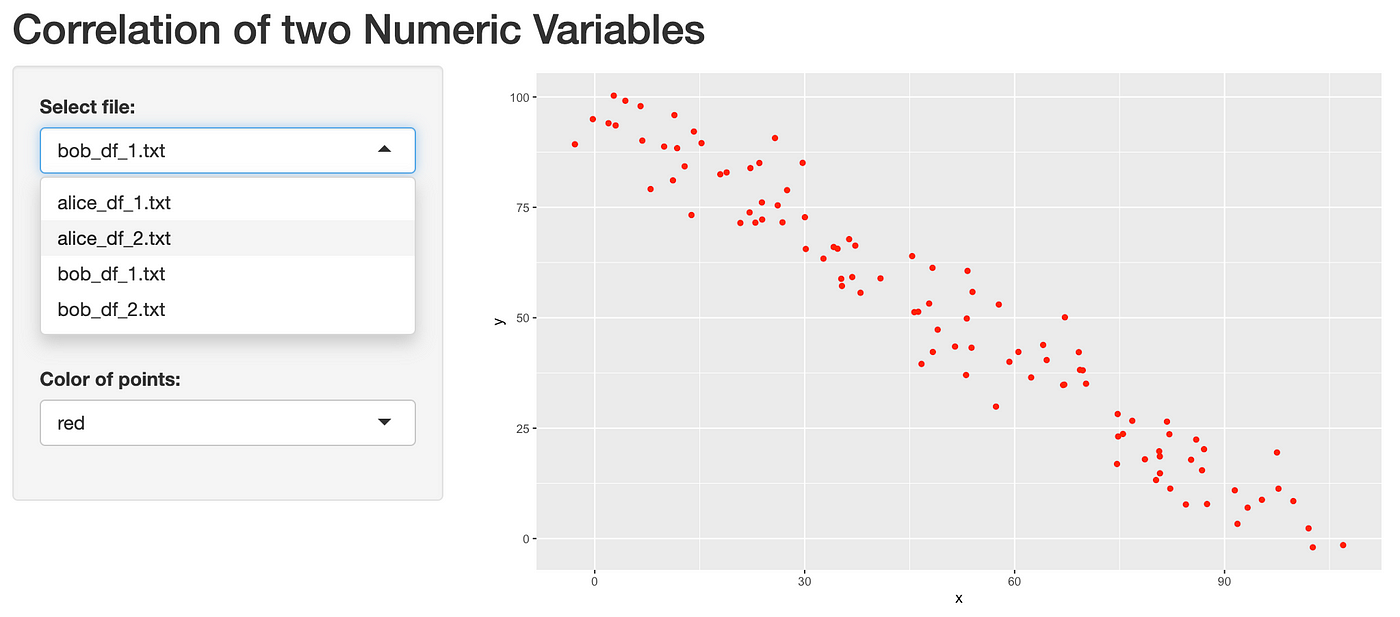
We can test these two apps locally by clicking "Run App" in the RStudio when we open the app.R file.
03. Build and run R Shiny app docker images
Now we have built two R Shiny apps, but they can only run on our local machines. To make them work on other computers, we'll take advantage of the docker containerization strategy I've explained above to build docker images.
To build a docker image, we need a base image to start with. We can copy files and install additional software or packages into the base image to build a new image. Docker Hub is a place where numerous pre-built docker images are publicly available. There is a community repository called 'rocker' that routinely updates common R-related docker images. The image we'll use is rocker/shiny-verse . We use the following command in the terminal to pull the image to the local machine:
docker pull rocker/shiny-verse As you may guess, rocker/shiny-verse is an environment already installed with R, R Shiny server, and several common packages including tidyverse. rocker/shiny-verse is built upon its base image rocker/shiny by installing tidyverse etc.. rocker/shiny is again built from rocker/r-ver, which is the base R environment. Now you can see how it works: the docker image is built layer by layer. When we need to build a docker image, we don't start from scratch (e.g. from the base operating system, or base R). We can just start with something pre-cooked and add our recipe on top of that. The figure below tries to explain this concept.
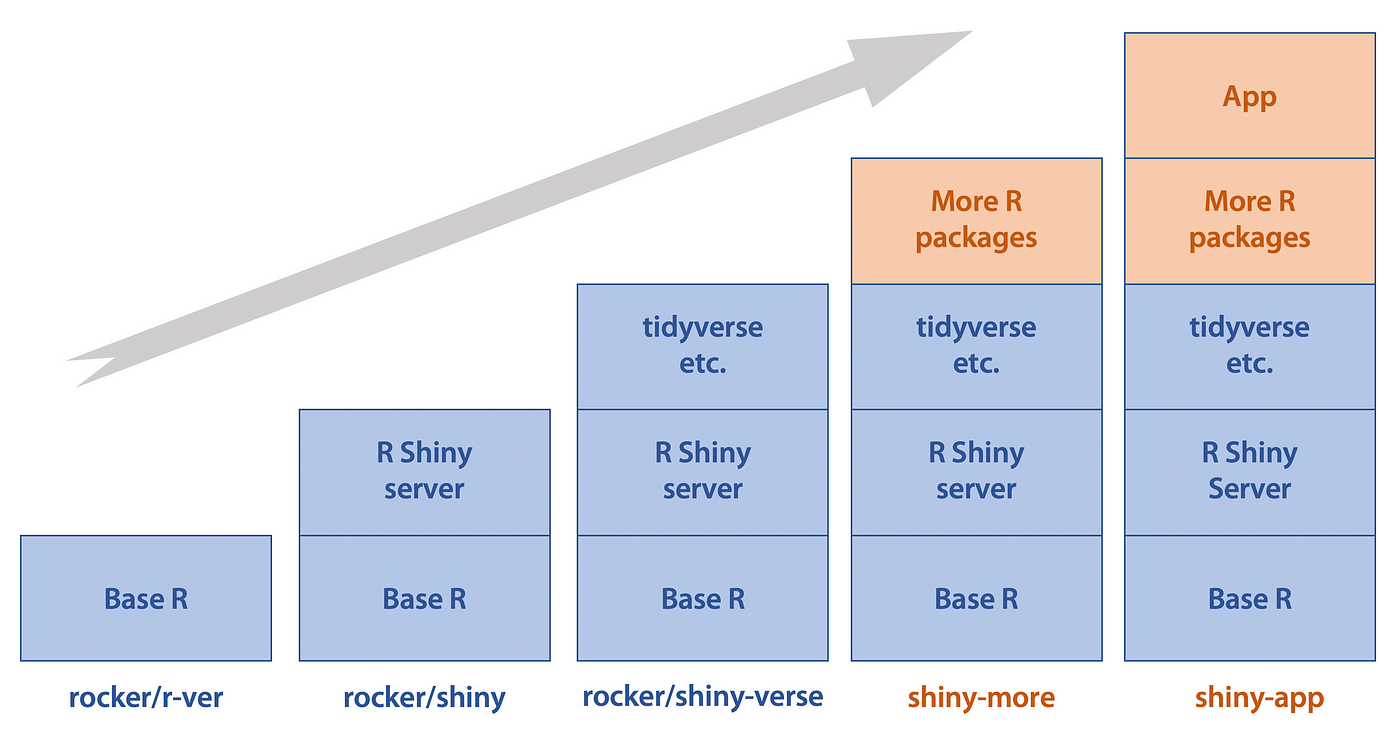
Usually, we need additional R packages to run our apps. Hence, we can install those packages on top of rocker/shiny-verse to build a shiny-more image. And finally, app files are copied and configured to build the shiny-app image that ready for running. Fortunately, our two apps don't require more R packages, thus the shiny-more image is not necessary. We can directly build shiny-app from rocker/shiny-verse.
📝 Note: Though the step from rocker/shiny-verse to shiny-more is skipped in this tutorial, I included the files needed to build this intermediate image in the GitHub since you'll need them. Technically, one can still go directly from rocker/shiny-verse to shiny-app even if more packages are needed, but by doing it this way, every time the app gets updated, it takes minutes to install all the packages again. Therefore, the best practice is to build the images layer by layer .
We need two files to build the shiny-app image: Dockerfile, which is always needed to build a docker image; shiny-server.sh, which runs the R Shiny server. As you can see from the GitHub directory, in the folder of each app, these two files are added on top of previous files. Now, in the terminal, within the ./Hist_App folder, run the following command:
docker build . -t shiny-hist This will build the shiny-hist image from rocker/shiny-verse. The base image is specified in the first line of Dockerfile: FROM rocker/shiny-verse:latest. The remaining lines are just commands to ask docker to do copying/installations/configurations. In the terminal, run docker images. Now we should see both rocker/shiny-verse and shiny-hist are there. Then, run:
docker run --rm -p 3838:3838 shiny-hist This will start our histogram app on the computer at port 3838. Open the web browser, and go to localhost:3838. We'll have an R Shiny app running in docker!
The steps are the same to run the scatterplot app: within the ./Scatter_App folder, run docker build . -t shiny-scatter (remember to change the image tag), and run docker run —-rm -p 3838:3838 shiny-scatter. The scatterplot app will be accessed at port 3838.
Now, we can run R Shiny app docker images on the local computer. But how to make them run on the remote machines? You may notice that rocker/shiny-verse has a rocker/ part. This is the repository name on the Docker Hub. The shiny-hist and shiny-scatter we've built are just local images and have not been pushed to Docker Hub. To make a push, sign up a Docker Hub account and login through the Docker Desktop or in the terminal:
docker login -u "username" docker.io After re-tagging the apps with the repository name, we can push our docker images online:
            docker tag shiny-hist username/shiny-hist
docker tag shiny-scatter username/shiny-scatter            docker push username/shiny-hist
docker push username/shiny-scatter
On other computers with docker installed, we can just pull the images to the local and run the apps.
04. Use ShinyProxy to deploy multiple R Shiny apps
We've already built two R Shiny apps and can utilize docker to deploy them on different computers easily. The next challenge is: how we can access and manage multiple apps from a single portal and add authentication to different users. This is when ShinyProxy comes into play. ShinyProxy is an open-source solution specifically developed to combine R Shiny and docker and provide additional multi-app functionalities including user authentication (even LDAP authentication). This allows a series of R Shiny apps to be deployed and used by multiple users in an enterprise context.
Let's say we want to access the two apps we've built from a single web page and only two users are allowed to log in: Alice and Bob. To achieve this, we need to have three new files in the same folder. Two files Dockerfile and application.yaml are in the GitHub directory. We should also download the shinyproxy-2.3.1.jar file from the ShinyProxy download page since it is a large file.
Before building the ShinyProxy image and running the apps, we should take a look at the application.yaml file to understand how it is configured to run. The lineauthentication: simple indicates we can directly set the usernames and passwords in the user section. Here, two users ("Alice", "Bob"), and their passwords are set. The R Shiny docker images are configured in the specs section: we can set the ID, display name, and descriptions of the apps, and most importantly, container-image should be shiny-hist or shiny-scatter, so ShinyProxy knows to run the correct image.
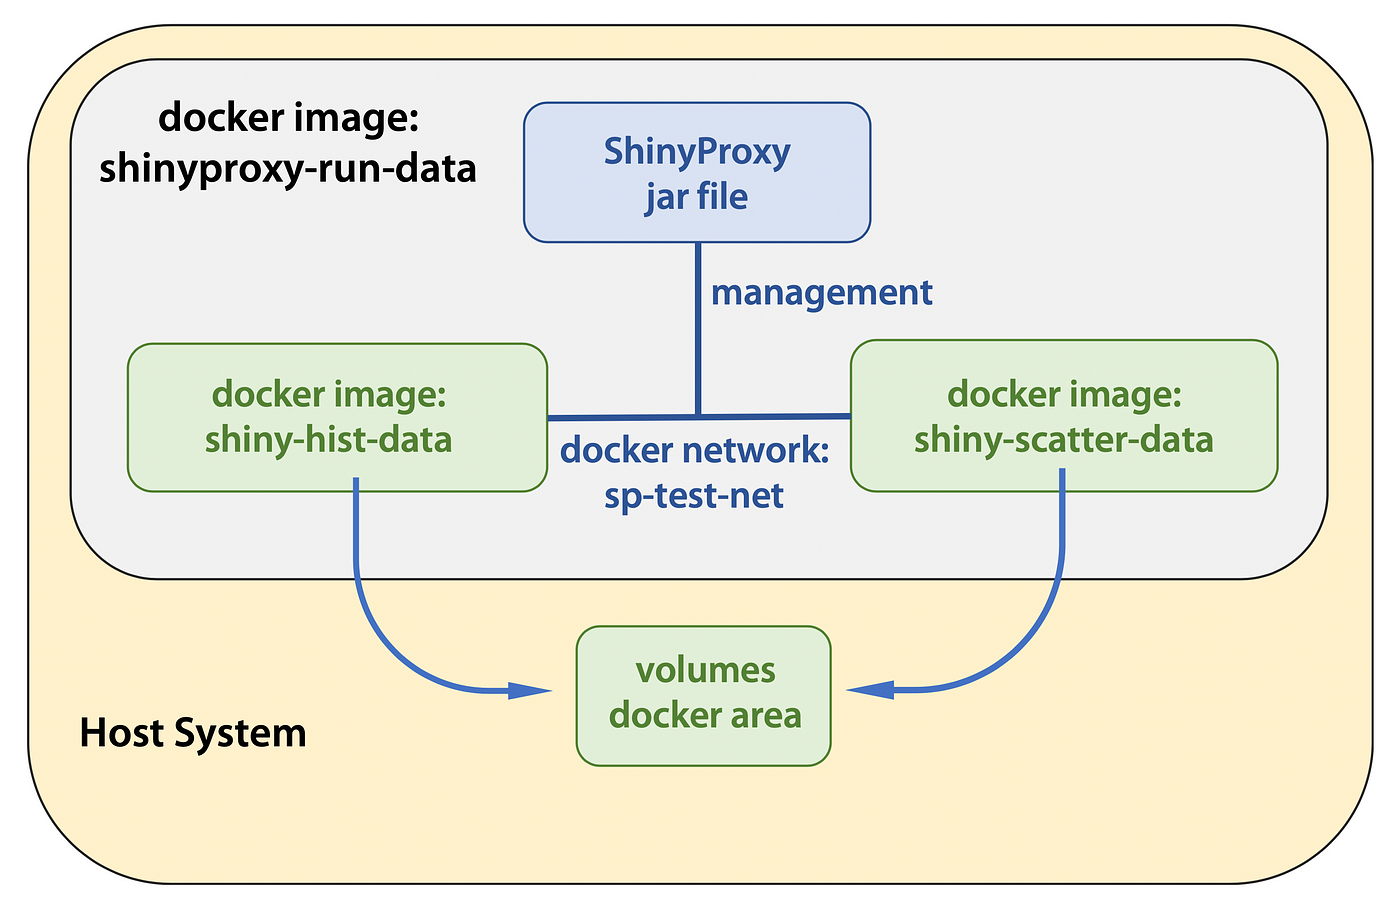
Another new concept is the docker network. This makes docker more powerful by connecting multiple containers. We can see in the application.yaml that docker: internal-networking: true and each image has container-network: sp-test-net. It makes the two apps run in a single docker network and managed by ShinyProxy. Moreover, ShinyProxy itself can run as a container. This section aims to build a total image that entails shiny-hist, shiny-scatter, and ShinyProxy all together. Again, anything can be packed and run as a container! The following figure illustrates the ShinyProxy design:

Therefore, before building the ShinyProxy image, we need to build the docker network first:
docker network create sp-test-net 📝 Note: If you try to build a docker network on a remote server, especially when using a VPN, you may need to specify the IP subnet mask to avoid IP address conflicts. The command I used is docker network create --driver=bridge --subnet 172.17.253.9/30 sp-test-net . Please see this link for detailed explanations.
The network name should be the same as the one we specified in application.yaml. Next, we build the ShinyProxy image to connect multiple R Shiny apps (The command should be run in the directory with application.yaml, shinyproxy-2.3.1.jar, and Dockerfile):
docker build . -t shinyproxy-run Finally, we run the shinyproxy-run and go to localhost:8080 on the web browser to see the results:
docker run --rm -v /var/run/docker.sock:/var/run/docker.sock --net sp-test-net -p 8080:8080 shinyproxy-run We should see a login page. By logging in with "Alice" or "Bob" and passwords, we are directed to the portal page with the two apps available.
📝 Note: There are lots of options to configure in the application.yaml file to exert the full potential of ShinyProxy. Detailed documentation can be found on this page .
05. Dynamic data access by docker volume
Having finished the previous steps, we can now deploy and manage multiple R Shiny apps from a single portal. But there is another flaw in our multi-app system: Currently, all the datasets are stored within the ./data folder of each app. This presents a difficulty for dynamic data access. If the datasets used by R Shiny apps are updated, we have to re-build the corresponding app docker image to make the new data accessible to the user. When the updates are frequent, it becomes infeasible to let users see instant data changes. Moreover, we may also want the apps to generate files in the host system, which is impossible if the docker container can only manipulate itself. Fortunately, docker can use volume to create a "docker area" in the host machine and mount it to the container, hence the container can access and manipulate the files in the host system.
To explore this feature, we should first move the data files out of the app folder. The tree structure of the previous section is like below:
            04-shinyproxy/
├── Dockerfile
├── Hist_App
│   ├── Dockerfile
│   ├── Hist_App.Rproj
│   ├── app.R
│   ├── data
│   │   ├── alice_vector_1.txt
│   │   ├── alice_vector_2.txt
│   │   ├── bob_vector_1.txt
│   │   └── bob_vector_2.txt
│   └── shiny-server.sh
├── Scatter_App
│   ├── Dockerfile
│   ├── Scatter_App.Rproj
│   ├── app.R
│   ├── data
│   │   ├── alice_df_1.txt
│   │   ├── alice_df_2.txt
│   │   ├── bob_df_1.txt
│   │   └── bob_df_2.txt
│   └── shiny-server.sh
├── application.yml
└── shinyproxy-2.3.1.jar
Let's re-organize the structure by creating a directory outside of the app folders for storing the data files used by both apps:
            05-data-on-host/
├── Data
│   ├── DF
│   │   ├── alice_df_1.txt
│   │   ├── alice_df_2.txt
│   │   ├── bob_df_1.txt
│   │   └── bob_df_2.txt
│   └── Vector
│       ├── alice_vector_1.txt
│       ├── alice_vector_2.txt
│       ├── bob_vector_1.txt
│       └── bob_vector_2.txt
├── Dockerfile
├── Hist_App
│   ├── Dockerfile
│   ├── Hist_App.Rproj
│   ├── app.R
│   └── shiny-server.sh
├── Scatter_App
│   ├── Dockerfile
│   ├── Scatter_App.Rproj
│   ├── app.R
│   └── shiny-server.sh
├── application.yml
└── shinyproxy-2.3.1.jar
Now if we try to run docker build in the ./Hist_App folder for the histogram app, there will be errors, since the ./Hist_App/data folder no longer exists. Instead, we should make changes in the Dockerfile and app.R (See the exact changes here).
We first deleted the lineCOPY data /srv/shiny-server/data in the Dockerfile, then changed the ./data/ to /Data/Vector/ in the app.R to tell the app that the data files are now stored at a different location. After rebuilding the docker image with a different tag:
            # within ./Hist_App folder
docker build . -t shiny-hist-data
We run the following command:
docker run --rm -v /Users/mingchuxu/Documents/projects/ShinyProxy-template/05-data-on-host/Data/:/Data -p 3838:3838 shiny-hist-data ## Note: The absolute path to /Data in your computer is different, please change it accordingly.
We can see the histogram app runs on localhost:3838 successfully. How does the app know the right location of data files? The trick is from the -v option in the command above. This option tells docker that we want to mount the host directory/Users/mingchuxu/Documents/projects/ShinyProxy-template/05-data-on-hist/Data as the /Data in the container (The option accepts the <host-dir>:<container-dir> format). That's why when we specify /Data/Vector/ in the app.R, the histogram app knows to go to /Users/mingchuxu/Documents/projects/ShinyProxy-template/05-data-on-hist/Data/Vector in the host system to find the data files.
We can make the same changes in the scatterplot folder (See the exact changes here), build a new docker image, and run it with the host directory mounted. The scatterplot app should also be running at localhost:3838:
            # within ./Scatter_App folder
docker build . -t shiny-scatter-data            docker run --rm -v /Users/mingchuxu/Documents/projects/ShinyProxy-template/05-data-on-host/Data/:/Data  -p 3838:3838 shiny-scatter-data            ## Note: The absolute path to /Data in your computer is different, please change it accordingly.
The next step is to combine the docker volume feature with ShinyProxy. In application.yaml, the option container-volumes is equivalent to the -v option in docker run, allowing us to configure it accordingly. Let's modify the application.yaml file (See the exact changes here), then build and run a new ShinyProxy image:
docker build . -t shinyproxy-run-data docker run --rm -v /var/run/docker.sock:/var/run/docker.sock --net sp-test-net -p 8080:8080 shinyproxy-run-data
Now from localhost:8080, we can run multiple R Shiny apps that read data from our host machine. The following figure illustrates the improved design compared with Figure 4. We are free to move the ./Data folder to anywhere on our computer. Just remember to modify the container-volumes option in application.yaml each time we change the absolute path and rebuild the ShinyProxy image.
06. Configure user-specific data access
Having finished the previous steps, we are now facing the last problem: how to make Alice and Bob access user-specific data? This can be solved by utilizing the environment variable created upon ShinyProxy login: SHINYPROXY_USERNAME.
First, let's add one more level to the hierarchy of Data/ folder. As shown in the tree structure below, alice*txt are put into Alice/ and bob*txt into Bob/. This allows R Shiny apps to access different folders based on different ShinyProxy login usernames.
            Data
├── DF
│   ├── Alice
│   │   ├── alice_df_1.txt
│   │   └── alice_df_2.txt
│   └── Bob
│       ├── bob_df_1.txt
│       └── bob_df_2.txt
└── Vector
              ├── Alice
              │   ├── alice_vector_1.txt
              │   └── alice_vector_2.txt
              └── Bob
              ├── bob_vector_1.txt
              └── bob_vector_2.txt
Next, we should make a series of modifications. Please see this GitHub commit for all the changes needed. Specifically, in the app.R file of each app, we need to add username <- Sys.getenv("SHINYPROXY_USERNAME") to get the login username, and modify the directory path by paste0() in both ui and server; in the shiny-server.sh file of each app, we should add the following two lines to pass the environment variable into the R Shiny app (explained in details here):
            env > /home/shiny/.Renviron
chown shiny.shiny /home/shiny/.Renviron
Then, as in Section 05, we will build new docker images for each app. Again, we use new docker image tags to distinguish them from images built in previous sections.
            # within ./Hist_App folder
docker build . -t shiny-hist-user            # within ./Scatter_App folder
docker build . -t shiny-scatter-user
Before building the final ShinyProxy image, we also need to modify the applicaiton.yaml since the docker images and volumes have all changed (See the exact changes here).
Finally, with the following commands:
            docker build . -t shinyproxy-run-user
# Note the tag name change            docker run --rm -v /var/run/docker.sock:/var/run/docker.sock --net sp-test-net -p 8080:8080 shinyproxy-run-user
We can check out localhost:8080 and see that Bob can only access files in the Bob/ folder now. Finally, we built a simple prototype of R Shiny app series allowing user authentication and user-specific data access!
How To Install Packages In R Shiny App On Shiny Server
Source: https://towardsdatascience.com/an-open-source-solution-to-deploy-enterprise-level-r-shiny-applications-2e19d950ff35
Posted by: micklethavite.blogspot.com
0 Response to "How To Install Packages In R Shiny App On Shiny Server"
Post a Comment