

How Do I Delete Apps In The Guest Account On My Galileo Pro
This chapter is from the book
Setting Up a Tablet for Multiple Users
Android includes multiuser features for tablets, so if you have a tablet, you can set it up with a separate account for each user. By creating user accounts, you give each user his own home screen, settings, and storage for documents. Each user can send and receive email and browse the Web without sharing his messages and history with other users. Each user can choose a different unlock method to keep his data safe.
Instead of creating a user account for another person, you can create a restricted profile, a kind of limited account that enables the user to access only some apps and content on your account. Like a user account, a restricted profile has a separate space and data on the tablet. You might want to create a restricted profile for a child that you allow to occasionally use your tablet.
Creating a User Account
When you create a new user account, it is best to have the person who will use the account with you so that she can set up the account immediately. In this way, you can ensure that the right person sets up the user account; you can also insist that the person sets an unlock method on the account to help protect the tablet.
If you must set up the new user account when the person is not available, the account appears on the lock screen without a security method. Anyone with access to the tablet can set up the user account, and there is no obligation to set an unlock method.
Here's how to create a user account:
- Open the Settings app.
- Tap the Users button in the Device section to display the Users screen.
-
Tap the Add User or Profile button to display the Add dialog box (see Figure 1.9).
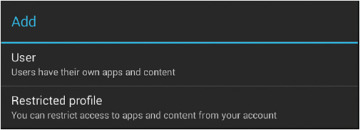
FIGURE 1.9 In the Add dialog box, tap the User button to start creating a new user account on your tablet.
-
Tap the User button to display the Add New User dialog box (see Figure 1.10).
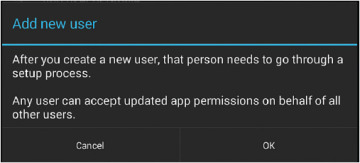
FIGURE 1.10 Tap the OK button in the Add New User dialog box.
-
Tap the OK button. Android displays the Set Up User Now? dialog box (see Figure 1.11).
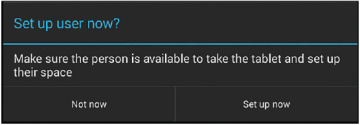
FIGURE 1.11 In the Set Up User Now? dialog box, tap the Set Up Now button if the user is available to set up her user account. Otherwise, tap the Not Now button.
- If the user is with you and can set up the account now, tap the Set Up Now button and hand over the tablet to the user. Otherwise, tap the Not Now button.
- Assuming you tap the Set Up Now button, the lock screen appears, showing an account button called New User. This account button is selected automatically. The user can swipe to unlock the screen, tap the Next button on the Welcome screen that appears, and then follow through the steps to set up the account.
If you tap the Not Now button in the Set Up User Now? dialog box, the user account appears in the Users & Profiles list on the Users screen as New User, Not Set Up. When the user is present and can set up the account, lock the tablet by opening the Quick Settings panel and tapping your account picture. The user can then tap the New User icon, swipe to unlock the screen, and follow through the screens to set up the account.
Creating a Restricted Profile
Here's how to create a restricted profile for a user:
- Open the Settings app.
- Tap the Users button in the Device section to display the Users screen.
- Tap the Add User or Profile button to display the Add dialog box.
-
Tap the Restricted Profile button to display the Application and Content Restrictions screen (see Figure 1.12).
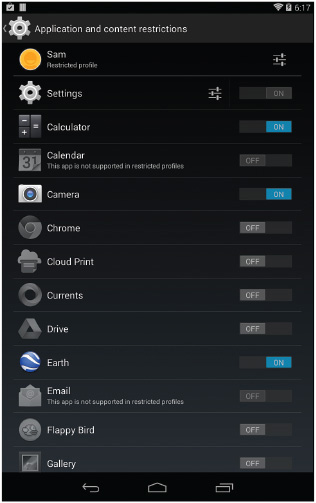
FIGURE 1.12 On the Application and Content Restrictions screen, choose which apps to make available in the restricted profile.
- Tap the New Profile button at the top to display the Profile Info dialog box.
- To add a custom icon to the profile, tap the default icon on the left side of the dialog box, tap the Take Photo button or the Choose Photo from Gallery button on the pop-up menu, and then take the photo or select the existing photo to use. You can then crop the photo as needed.
- Type the name for the profile, replacing the default name, New Profile.
- Tap the OK button to close the Profile Info dialog box and apply the name.
- Touch the Settings icon to the left of the On/Off switch on the Settings button to display the list of settings. You can then tap a check box to control whether the user can use the feature. For example, select the Location check box to enable the user to use the Location feature.
- Specify which apps you want the user to be able to use by setting its switch to the On position. Make sure the switch for each app you don't want the user to use is set to the Off position.
- Tap the Back button to return to the Users screen.
Switching Among User Accounts and Profiles
After you set up an account for each full user and a restricted profile for each person who needs less freedom, you can easily switch among the accounts and profiles. Follow these steps:
- Pull down from the upper-right corner of the screen to display the Quick Settings panel.
-
Touch your user account icon to lock the tablet. The lock screen appears, showing the list of users as circular buttons at the bottom. The larger circle indicates the last user. The lock screen shows that user's lock screen wallpaper and unlock method (for example, swipe or password).
- Tap the button for the user account or restricted profile to which you want to switch. The circle for that account or profile grows larger, and the lock screen changes to show the wallpaper and unlock method set for that account or profile.
- Unlock the screen by using that unlock method. For example, type the password and press the Enter key.
Deleting a User Account or Restricted Profile
If you no longer need a particular user account or restricted profile, you can delete it from your tablet. Follow these steps:
- Open the Settings app.
- Tap the Users button in the Device section to display the Users screen.
- Tap the Delete icon (the trash can) on the button for the account. The Remove User? dialog box or the Remove Profile? dialog box opens, warning you that the user's or profile's space and data will disappear from the tablet.
- Tap the Delete button to finish removing the user account or profile.
Understanding and Avoiding Problems
Sharing a tablet with others can be a great way to get more computing out of your hardware budget, but it may bring some problems with security, storage space, and performance.
Apart from actually having to share the physical device, you need to ensure security for your data and that of each user. Make sure you lock the tablet consistently so that nobody can access it without entering a PIN or passcode.
Be aware that each user can accept updated app permissions for the tablet as a whole. This means you should create full user accounts only for people you can trust to deal sensibly with app updates.
With several users storing data and files (especially media files) on the tablet, space may run low. You will need to manage the device's storage using the techniques discussed later in this chapter.
If several users have sessions open at the same time, the tablet may start running more slowly because it is low on memory. You can try closing apps, or getting other users to close their apps so yours will run better, but you will normally be better off restarting the tablet.
How Do I Delete Apps In The Guest Account On My Galileo Pro
Source: https://www.informit.com/articles/article.aspx?p=2272156&seqNum=5
Posted by: micklethavite.blogspot.com
0 Response to "How Do I Delete Apps In The Guest Account On My Galileo Pro"
Post a Comment